In this article, we will learn how to configure a project that use Webpack and Babel in front-end. It is a first step to work with larger project in the future. So, let’s get started.
Table of contents
What is Webpack ?
-
Definition of Webpack
Webpack is a
Module bundle. It takes a bunch of assets such as source, images, css, … to turn them into something that we will send to client. It means that it will package all dependencies into bundles that browser can understand.By default, Webpack only knows how to process
.jsor.jsonfiles. To do with other format files, we need to useLoadersuch asHtmlWebPackPluginfor html file, …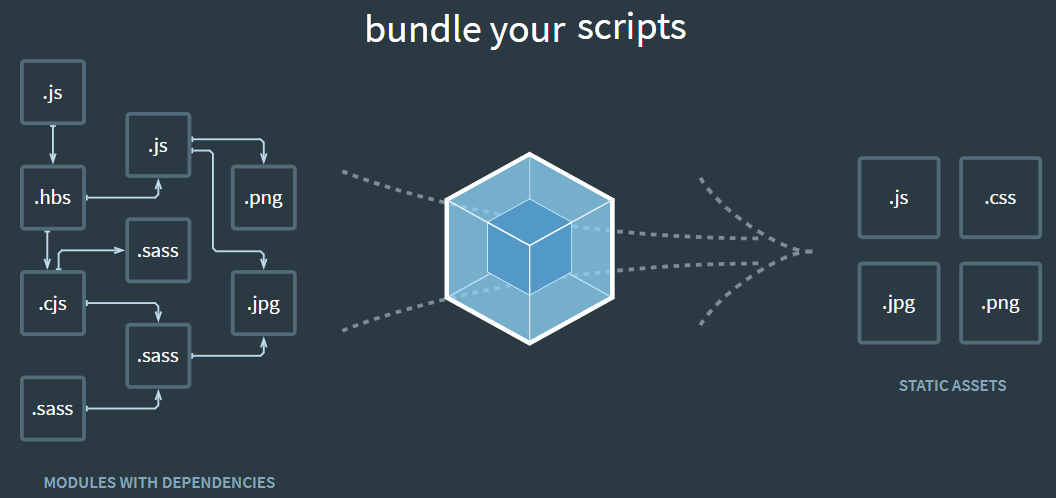
-
Some functionalities in webpack
- Hot module reloading: updates React component without refresh website.
- Lazy loading
- Bundle splitting
- Hashing
- Source maps: debug minified version.
-
Folder structure of Js application that use Webpack and Babel
- node_modules
- dist/
- index.html
- src/
- index.js
- package.json
- webpack.config.js
When Webpack run, Javascript files in source folder
/srcwill be bundled into a single Javascript file which will be placed automatically into the/distfolder./distwill be used to serve our applicatioin to the browser. -
Some modes in Webpack
There are two modes:
-
development: This mode will remain the structure of file, so, we can easily read source code.
In order to use development mode, we can configure in package.json file:
"scripts": { "start": "webpack-dev-server --mode development --open --hot", "build": "webpack --mode development" } -
production:
To production mode, all files will be minified. So, these files will be reduced the files’s size.
-
What is Babel ?
Babel is a toolchain that is mainly used to convert ECMAScript 2015+ code into a backwards compatible version of JavaScript in current and older browsers or environments.
Setup some packages Webpack and Babel
-
For webpack
To work with Webpack easily, we need to install some additional packages.
-
webpack
npm install --save-dev webpackWebpack does not compile anything. It simply bundles all things together.
--save-devwill saves these packages to devDependencies of package.json, which means these are development packages and user may avoid installing these packages. -
webpack-dev-server
npm install --save-dev webpack-dev-serverUnder the hood,
webpack-dev-serveris a mini Node.js Express server. It uses a library called SockJS to emulate a web socket.webpack-dev-serveris a localhost server which we will use to preview how our web application works. The server will automatically send reload events to the browser to refresh the pages as soon as we make changes to the code. This should be used for development only.To run our project with
webpack-dev-server, we need to configure in package.json file:"script": { "start:dev": "webpack-dev-server --config ./webpack.config.js --mode development", "build": "webpack --config ./webpack.config.js --mode production" }And run the following command in our terminal/console:
npm run start:dev -
webpack-cli
npm install --save-dev webpack-cliIt provides a flexible set of commands for developers to increase speed when setting up a custom webpack project.
We can refer the link of Webpack CLI
-
webpack-merge
npm install --save-dev webpack-mergeAssuming that we have two modes such as: production and development, we want that each mode will have corresponding webpack configuration file. So, we need
webpack-mergepackage to do that.
-
-
Webpack plugin
-
uglifyjs-webpack-plugin
npm install --save-dev uglifyjs-webpack-pluginIt will be used to minify Javascript bundle made by Webpack.
-
html-webpack-pluginandhtml-loaderhtml-loaderis used to processhtmlfile.html-webpack-pluginwill inject js, css into html files, and it is reponsible for create output files in./distfolder. Andhtml-webpack-pluginis needed by webpack-dev-server to launch a web preview of our plugin.npm install --save-dev html-webpack-plugin html-loaderIf we want to remove the
/distfolder with every Webpack build, it means that the automatic generateddist/bundle.jsfile should be removed, anddist/index.htmlfile will be added automatically. We do not want to createdist/index.htmlfile manually for every Webpack build again, so, we can usehtml-webpack-plugin.It will simplify creation of HTML files to serve our webpack bundles. This is especially useful for webpack bundles that include a hash in the filename which changes every compilation.
We can refer link about html-webpack-plugin.
Update some plugins in webpack.config.js file:
const HtmlWebPackPlugin = require("html-webpack-plugin"); module.exports = { module: { rules: [ ... }, plugins: [ new HtmlWebPackPlugin({ template: "./src/index.html", filename: "./index.html" }) ] }; -
clean-webpack-plugin
Because of automatically generating
dist/index.htmlanddist/bundle.jsfiles, we can delete the content of our/distfolder with every Webpack build. So, we need to installclean-webpack-plugin.npm install --save-dev clean-webpack-plugin
-
-
For hot reload
-
react-hot-loader
If we want to use hot loading module when we have changes in our files, we should use
react-hot-loader.npm install --save-dev react-hot-loaderAdd this plugin into webpack.config.js file:
plugins: [
  new webpack.HotMoudleReplacementPlugin()
],
devServer: {
  contentBase: './dist',
  hot: true
}
In
src/index.jsfile, we need to define that hot reloading is available:import React from 'react'; import ReactDOM from 'react-dom'; const title = 'React with Webpack and Babel'; ReactDOM.render( <div>{title}</div>, document.getElementById('app') ); module.hot.accept();
- For Resource
-
file-loader
npm install --save-dev file-loaderThe
file-loaderresolvesimport / require()on a file into a url and emits the file into the output directory.To know more information about
file-loader, we can refer link.For example:
In other-file.js, we have:
// It means we will import or require the target files in one of the bundle's file
import img from './file.png';
Then, we have to add
file-loaderinto webpack.config.js file.rules: [ { test: /\.(png|jpe?g|gif)$/i, loader: 'file-loader', options: { name: '[name].[ext], outputPath: 'assets/images' } } ]With the above configuration, images will be emitted to
dist/assets/images/file.png.
-
CSS loader and plugin
-
css-loaderandstyle-loadernpm install --save-dev css-loader style-loaderWe will use
css-loaderandstyle-loaderto import.cssfile into Javascript file (whichsass-loadergenerates) and finally inject into DOM instyletag. -
sass-loaderandnode-sassnpm install --save-dev sass-loader node-sassTo load
.scssfiles into Javascript file using ES6 import syntax and compile them to CSS, we need to installsass-loaderandnode-sasswhich will do actual compilation. -
postcss-loader,cssnano, andautoprefixernpm install --save-dev postcss-loader cssnano autoprefixerTo minify and add prefixes to CSS (for browser compatibility) we need to use
postcss-loaderand some its dependencies such ascssnano,autoprefixerto do its actual works.In webpack, we can use postcss-loader with autoprefixer and other PostCSS plugins. So, in webpack.config.js or webpack.prod.js or webpack.dev.js, we have:
module.exports = {
  module: {
    rules: [
      {
        test: /\.css$/,
        use: ["style-loader", "css-loader", "postcss-loader"]
      }
    ]
  }
}
Then, we have to
create postcss.config.jsfile:module.exports = { plugins: [ require('autoprefixer') ] }To know more information about configuration of css plugin, we can reference to link.
-
mini-css-extract-plugin
npm install --save-dev mini-css-extract-pluginThis plugin extracts CSS into separate files. It creates a CSS file per JS file which contains CSS. It supports On-Demand-Loading of CSS and SourceMaps.
It builds on top of a new webpack v4 feature (module types) and requires webpack 4 to work.
Compared to the extract-text-webpack-plugin:
- Async loading
- No duplicate compilation (performance)
- Easier to use
- Specific to CSS
Refer to link.
-
optimize-css-assets-webpack-plugin
npm install --save-dev optimize-css-assets-webpack-pluginThis plugin will search for CSS assets during the Webpack build and optimize / minimize the CSS (by default it uses
cssnanopackage).We can refer this link.
-
-
For Babel
-
babel-loader
It is the Webpack loader responsible for taking in the ES6 code and making it understandable by the browser. It will load ES6 modules in node.js using import syntax (node.js does not support
importsyntax). So, we need to installbabel-loaderand@babel/core.npm install --save-dev babel-loader @babel/coreA loader has basic three parts:
- test - use regex to determine the type of files
- exclude - the folders that we want Webpack omits
- use: loader - the loader that we want to Webpack use to process files.
-
@babel/preset-env
It is used to compile Javascript ES6 down to ES5. And
babel-preset-es2015package is deprecated.With ES6 arrow function,
@babel/preset-envwill convert arrow function to traditional function.npm install --save-dev @babel/preset-env -
@babel/preset-react
In order that the syntax of React will be understood by other browsers, so we need Babel to transpile React code
JSXto Javascript.npm install --save-dev @babel/preset-reactThen, we will find
.babelrcfile to add some configuration lines:{ "presets": [ "@babel/preset-env", "@babel/preset-react" ] }Finally, let’s inform Webpack in webpack.config.js file about files with JSX extension to make sure that they run through the transpiling step:
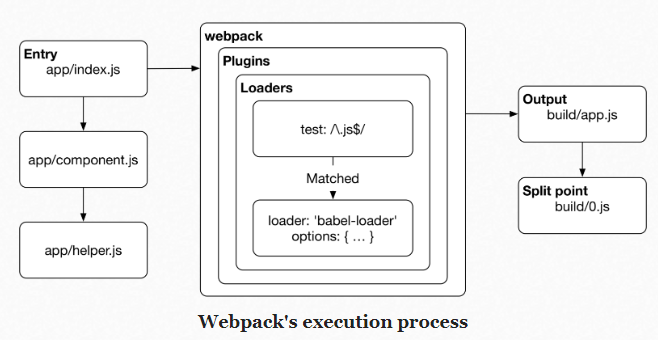
module.exports = { entry: './src/index.js', module: { rules: [ { test: /\.(js|jsx)$/, exclude: /node_modules/, use: ['babel-loader'] } ] }, resolve: { extensions: ['*', '.js', '.jsx'] }, output: { path: __dirname + '/dist', publicPath: '/', filename: 'bundle.js' }, devServer: { contentBase: './dist' } }; -
babel-preset-transform-object-rest-spread
npm install --save-dev babel-preset-transform-object-rest-spreadIt is a plugin to support Object rest/spread syntax if our babel preset doesn’t support it.
-
-
For React.js
Install some packages for react.js:
// Use must-downloaded react, react-dom packages npm install --save react react-dom // if we want to use typescript with react npm install --save-dev @types/react @types/react-dom // use Prop-types to document our React components // https://reactjs.org/docs/typechecking-with-proptypes.html npm install --save-dev prop-types -
For Redux
We will install some packages for redux, like that:
// Use redux
npm install --save redux react-redux react-router-dom

// If we want to program asynchronous with redux, use redux-thunk
npm install --save redux-thunk

// we can use typescript versions of above packages
npm install --save-dev @types/react-redux @types/react-router-dom
Wrapping up
-
Understanding how Webpack works, we can easily configure all project that use Webpack and Babel.
-
Remember that all above plugins or loaders that are necessary to work.
-
Below is the content of
webpack.config.jsfile that we need to know:const webpack = require("webpack"); const path = require('path'); const HtmlWebPackPlugin = require('html-webpack-plugin'); const FaviconsWebpackPlugin = require('favicons-webpack-plugin'); const CopyWebpackPlugin = require('copy-webpack-plugin'); const assets = [{ from: 'assets', to: 'assets' } ]; module.exports = { // Where to start bundling entry: { app: "./src/index.js", home: './src/home.js', contact: './src/contact.js' }, // Where to output output: { // Output to the same directory or use dist child directory path: path.resolve(__dirname, 'dist'), // __dirname publicPath: '/', // Capture name from the entry using a pattern filename: "bundle.js" }, // How to resolve encountered imports module: { rules: [ { test: /\.css$/, use: ["style-loader", "css-loader"], }, { test: /\.(ts|tsx|js|jsx)$/, exclude: /node_modules/, use: "babel-loader" // or we can use awesome-typescript-loader }, { test: /\.html$/, use: [ { loader: "html-loader", options: { minimize: true } } ] }, { test: /\.scss$/, use: [ 'style-loader', 'css-loader', 'postcss-loader', 'sass-loader' ] }, { test: /\.(woff(2)?|ttf|eot|svg)(\?v=\d+\.\d+\.\d+)?$/, use: [{ loader: 'file-loader', options: { name: '[name].[ext]', outputPath: 'assets/fonts/' } }] }, { test: /\.ico?$/, use: [{ loader: 'file-loader', options: { name: '[name].[ext]', outputPath: './' } }] }, ] }, // What extra processing to perform plugins: [ new FaviconsWebpackPlugin('./assets/images/logo.png'), new webpack.DefinePlugin({ SUBDIRECTORY: JSON.stringify(require("./package.json").subdirectory) }), new uglifyJsPlugin(), new HtmlWebPackPlugin({ template: "./src/index.html", filename: "./index.html" }), new CleanWebpackPlugin(), new webpack.HotModuleReplacementPlugin(), new CopyWebpackPlugin(assets) ], // Adjust module resolution algorithm resolve: { extensions: ['.ts', '.tsx', '.js', '.jsx', '.json'] }, devServer: { colors: true, contentBase: './dist', historyApiFallback: true, hot: true, inline: true, port: 3000, progress: true, stats: { cached: false } } };
Refer:
https://blog.linguinecode.com/post/how-to-setup-webpack-dev-server-react-babel
https://gaearon.github.io/react-hot-loader/getstarted/
https://www.valentinog.com/blog/babel/
https://www.valentinog.com/blog/webpack/
https://levelup.gitconnected.com/what-is-webpack-4fdb624597ae
https://tech.3si.vn/2017/11/24/meo-toi-uu-hoa-webpack-bundle/
https://www.robinwieruch.de/webpack-setup-tutorial
https://survivejs.com/webpack/what-is-webpack/
https://www.robinwieruch.de/webpack-advanced-setup-tutorial
https://www.robinwieruch.de/minimal-react-webpack-babel-setup
https://www.robinwieruch.de/minimal-react-webpack-babel-setup#react-webpack
https://www.robinwieruch.de/webpack-babel-setup-tutorial
http://vuilaptrinh.com/2018-05-25-huong-dan-viet-code-javascript-tot-hon-voi-webpack/